Did you think that our painting was finished? Me too. But then I convinced myself (and Dan) that we should paint the hallway. To be honest, it did need some paint due to some scuffs and a Magic Eraser tragedy. Warning: do not use a Magic Eraser on anything but white walls! So, we not only slapped a coat of paint on the hallway but did a detailed stripe pattern that required time and technique. Can I hear a "Waahoo!!"? Good thing we had Labor Day Weekend to work on this but don't worry, we had time to hit up the State Fair, hang with friends and some other fun stuff too :) So here it goes!
Dan's good friend Jon stopped over that night to say hello and, of course, got roped into the logistics of the stripes. You were very helpful Jon! Good thing you left before things got intense :)
Here is a before shot of the hallway and the wall that wraps around:
The paint color choice was definitely a process as we wanted to match the current color so that the entire living room would still match and flow. As for the white...if only white were just that...WHITE! But it is SO not! I didn't want it too stark white but I didn't want it to clash and be darker than the baseboards. The winners were Behr's Mesa Taupe and Behr's White Linen.
Some more before shots...

Unfortunately, due to the scuffs on the wall, we needed to re-paint the entire hallway white to make everything fresh and new.


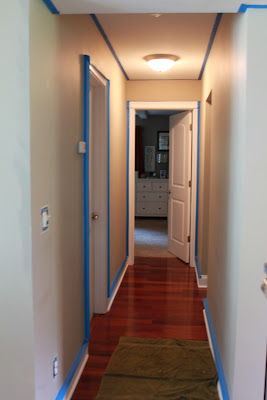
As I kept on with the first white coat, Dan came behind me and taped off all the trim. I'm so thankful he does this part! I hate taping.
After the trim was taped and the white coat of paint was on, we headed out to the Great Minnesota Get Together for some deep fried food on a stick! We rode the state fair transit bus from a mall by our house and it worked out pretty slick! Corn on the cob, deep fried pickles, Leinenkugel's beers, and a soft pretzel with cheese!
And then...Hi Ho! Hi Ho! It's back to work we go! Next step was to measure off all of the stripes and tape them. Yay. (can you sense my enthusiasm?) This portion of the project highlighted some of Dan's most valuable qualities: accuracy, focus, patience. :) This is why I love having him around to help with this stuff!
When it came to decide on the overall plan of how the stripes look on the wall, I was a little overhwhelmed. But at the same time, I knew exactly what I wanted it to look like. So after I explained it to Dan like, "I think each stripe should be about this wide (with a fluid, inaccurate hand gesture) and I think there should be an odd number of dark stripes. Also, not that many stripes total, but not too little." I was clear that I wanted the top stripe to be a dark one and the bottom stripe to be a dark one-mostly so the baseboards would be a nice contrast. I think he got the idea! Magically...


For anyone interested in doing a project like this, each of the stripes was 13 inches wide. The bottom stripe might have been closer to 14 (just asked Dan for accuracy). I had read that it was important to use Frog Tape instead of the standard blue tape and I would completely endorse this recommendation! That stuff is amazing! This was our first time using it but I can't imagine having crisp lines with anything else.

Another huge tip that I read from other bloggers, and then thankfully implemented, was the technique of sealing in the frog tape. At first, I was very confused about this process but the idea is to prevent paint from seeping under the tape so that each stripe is close to perfect. So, in simple terms, for the "insides" of each "taupe" stripe we would be painting, I went through and lightly painted the edges of the tape to seal it with the white paint. After this dried and we went back and actually painted the taupe stripes, it was nearly impossible for any of that paint to sneak it's way through and onto a white stripe. Does that make sense? I sure hope so!
After all the "to be" taupe stripes were sealed in, the hallway looked like this:
Phew! By now, we're honestly wanting to be finished. I get really antsy! But next was to paint the actually taupe colored stripes. About midway through, we noticed we would run out of paint. With 20 minutes to closing time, Dan raced to Home Depot as I called in the paint color to be mixed so it would be all ready when he ran into get it!
Make sure to really concentrate and check each time that you're about to paint the right stripe! I've seen sticky notes used on other blogs to label the color of each stripe so there's no oopsies!
As I was even still painting the stripes, Dan came behind me and started peeling off the Frog Tape. Do not wait to peel off the tape or else it will not be the cleanest line!
Here's an in-progress pic before we hung everything back up!
We love it!! Worth every second! Dan is always amazed at what things look like when we finish, it is so hilarious! I think because I spend so much time looking at pictures of ideas and he doesn't so it really is a surprise to him! Good thing he trusts me! (but kind of scary at the same time :)
Yay!!


